Getting Started#
The getting started library helps you to make the first steps of your journey exploring the library. We guide you through the installation process and teach you how to efficiently use the documentation, hopefully minimizing your learning curve.
Prerequisites#
In order to use Python with AxisVM, you need to have
A licensed version of AxisVM installed on your computer
Python >= 3.8 and <= 3.10
This library (see installation later)
The AxisVM COM API REFERENCE GUIE. This is a pdf document, avaliable at the downloads of AxisVM’s homepage.
Installation#
Register AxisVM’s Type Library#
If this is not your first time using AxisVM through a COM interface on your machine, you should already have a registered type library and you can skip this step. Otherwise, you have to register the type library of your AxisVM application. Different versions come with different type libraries, so you might redo this step when you update to a new version. At all times, older versions must be unregistered from the Windows registry before new registrations!
To have your AxisVM registered, locate the folder on your filesystem AxisVM is installed into. In that folder you should see a file called !REGISTER_AXISVM_X64 and !REGISTER_AXISVM. Double click on the first for a 64-bit, or the second one for a 32-bit installation. It is important to register only the version that is required and matches with the version of installed AxisVM.
To unregister a type library, the step is similar, but now you use the files !UNREGISTER_AXISVM_X64 and !UNREGISTER_AXISVM.
Install the Python package for AxisVM#
This is optional, but we suggest you to create a dedicated virtual enviroment at all times to avoid conflicts with your other projects. Create a folder, open a command shell in that folder and use the following command
>>> python -m venv venv_name
Once the enviroment is created, activate it via typing
>>> .\venv_name\Scripts\activate
The AxisVM python package can be installed (either in a virtual enviroment or globally) from PyPI using pip on Python >=3.8 <=3.10:
>>> pip install axisvm
Launch AxisVM from Python#
The axisvm.com.client submodule implements various tools to handle the client side operations of creating a COM connection. Import the module and start a new application instance with the start_AxisVM method:
from axisvm.com.client import start_AxisVM
axapp = start_AxisVM(visible=True)
To test the connection, you can query the path of the executable being run by typing axapp.FullExePath.
Connecting to a running instance of AxisVM#
If you want to be able to connect to an already running instance of AxisVM, you need to start the executable with the /MULTIINSTANCECOMCLIENTS parameter. The simplest way of achieving this is to locate the icon of AxisVM on your desktop (I assume you have one) and modify the target of it to end with /MULTIINSTANCECOMCLIENTS. The target of your shortcut should look like
“C:\AxisVM\AxisVMX7\AxisVM_x64.exe” /MULTIINSTANCECOMCLIENTS
or something close to it. Then, you can connect to a running AxisVM instance by using a slightly different version of the previous code snippet:
from axisvm.com.client import start_AxisVM
axapp = start_AxisVM(visible=True, join=True)
Here, the join=True parameter tells the library that if you’d prefer to join a running instance, if there is any. If there is no running instance, a new instance of AxisVM is created.
How to use the API#
The Python library has two layers. The first one is the raw type library extracted from AxisVM using the comptypes package. We are working on an online version of it, until that the documentation of this layer is only available in pdf format, that you should already posess at the moment of reading this notebook. If you don’t have it yet, go to our website, and look for it under downloads. It is important that this documentation is language agnostic, and you won’t find the Pythonic versions of the function calls directly in it, but don’t worry, the user guide has several examples to help you get the hang of it. After little practicing, you will know how to call any of the API endpoints listed in the pdf document.
Basic API usage#
Firts of all, we need a runnning AxisVM either in the background, or with the graphical interface.
from axisvm.com.client import start_AxisVM
axvm = start_AxisVM(visible=True, daemon=True)
As a consequence of the hierarchical structure of the models in AxisVM, every model creation proccess starts with nodes. To create nodes we need an interface to the nodes of the application. This is achieved by the IAxisVMNodes class of the type library. If you look it up in the pdf document, you will see this:
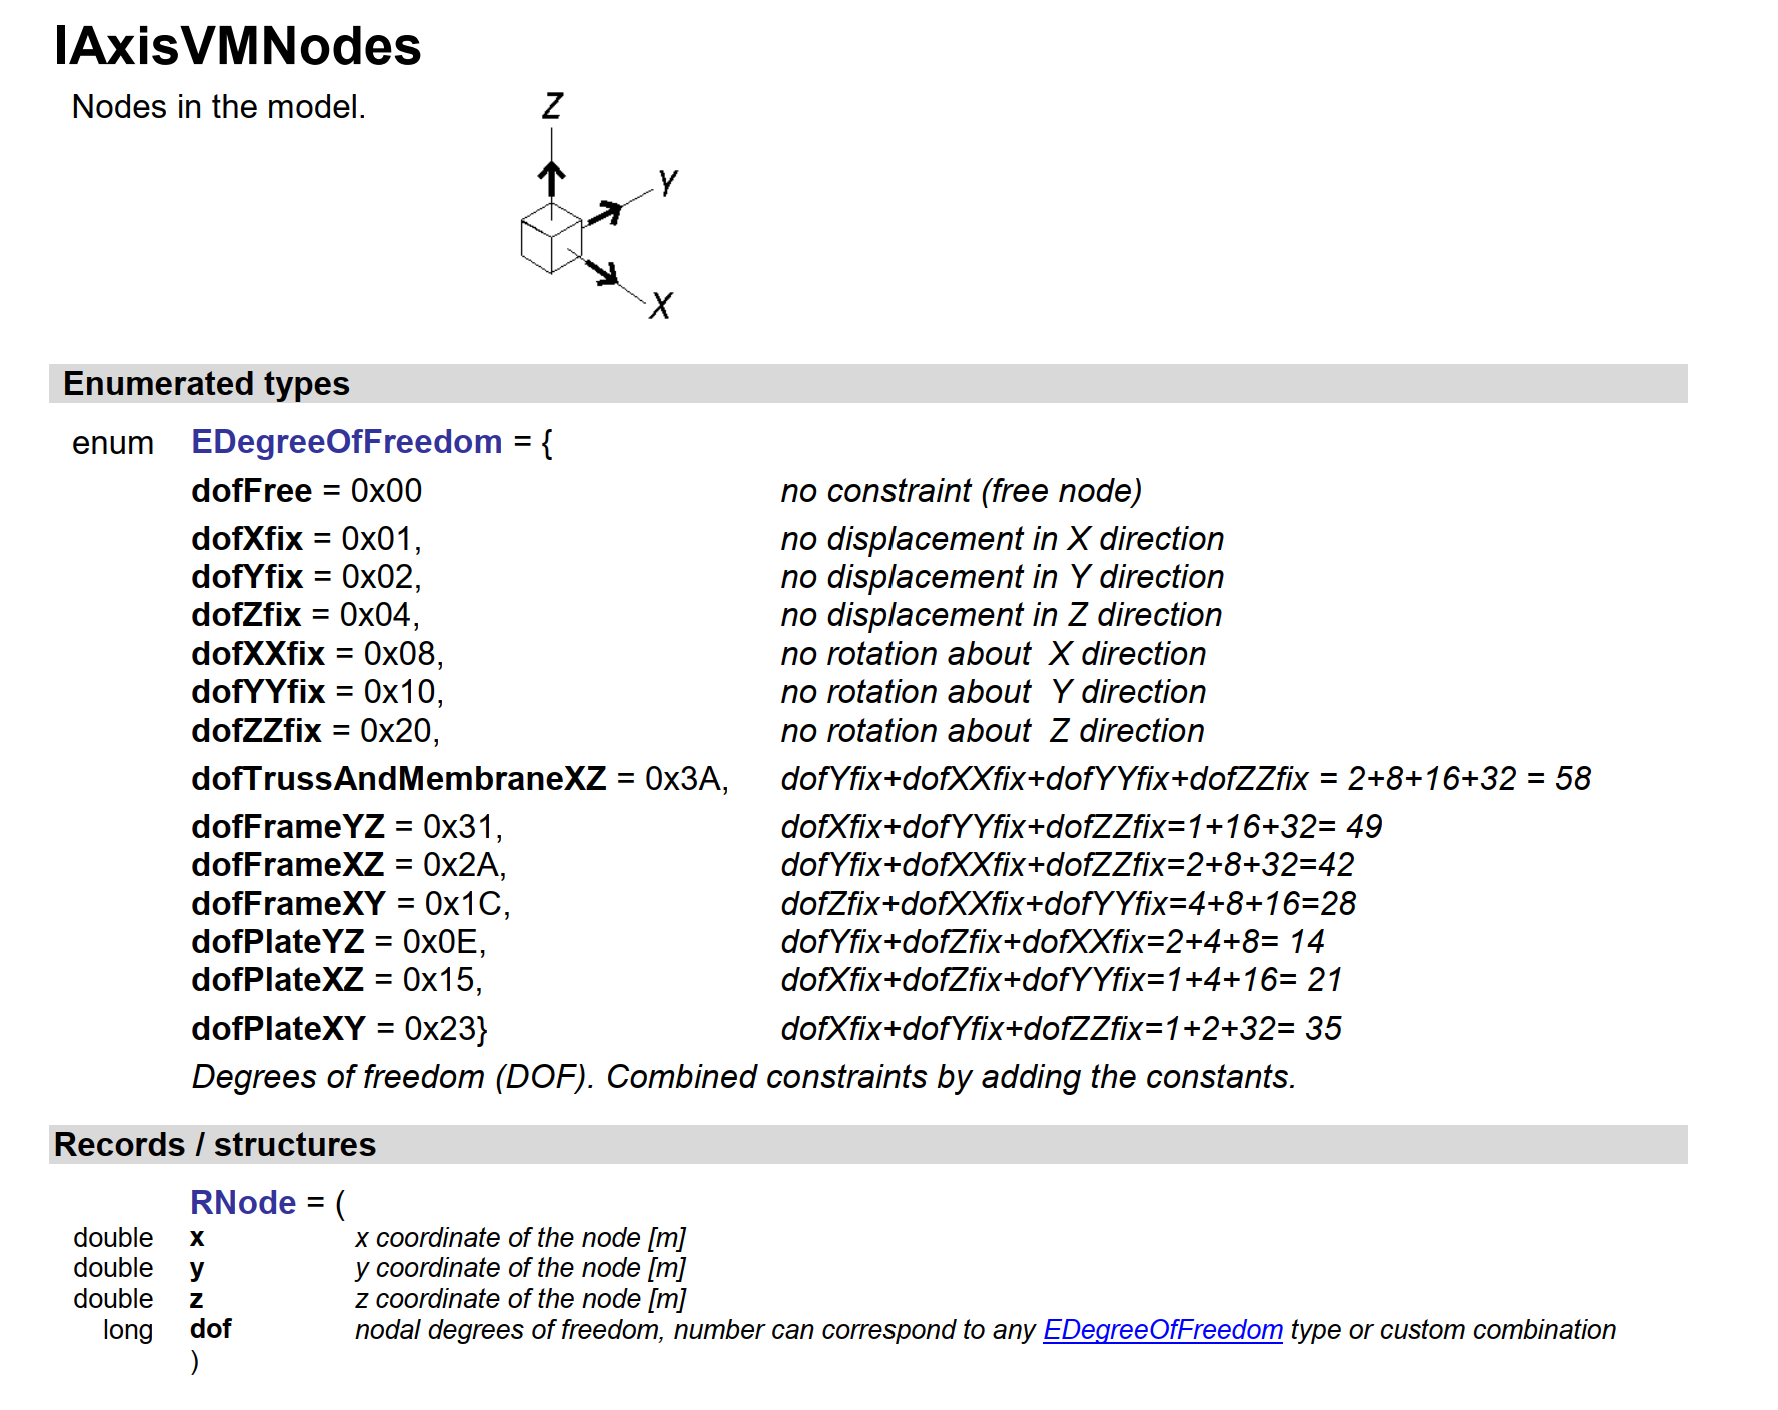
Just like other interfaces, the documentation of IAxisVMNodes begins with listing the enumerations and records specific to nodes. Below these, you can see the functions of the interface.
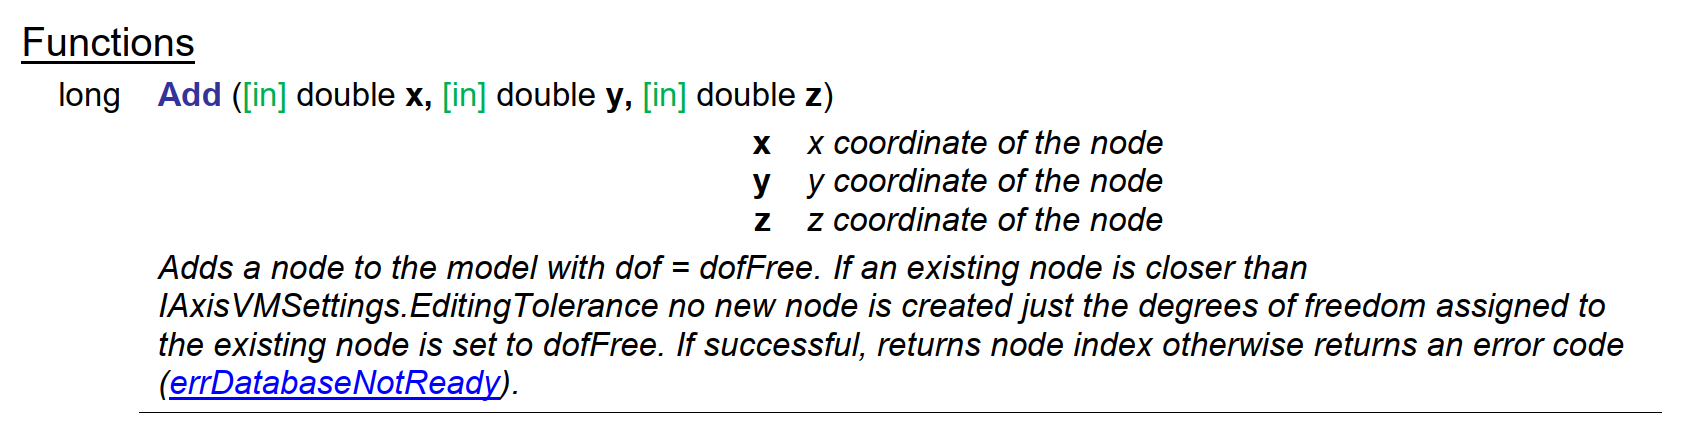
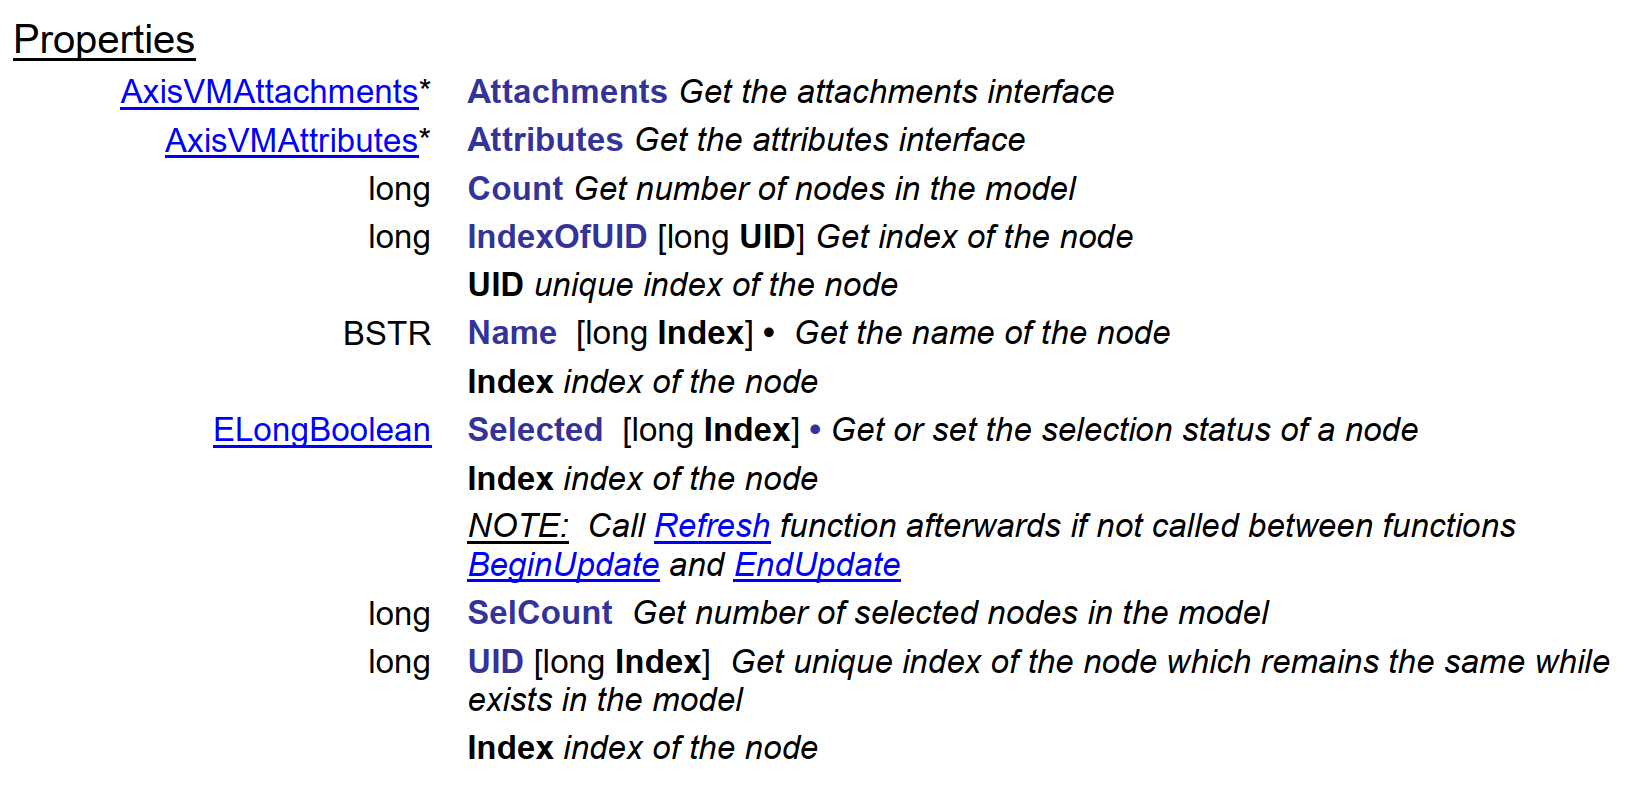
After all the functions, the documentation of the interface is finished by listing the properties of the interface.
from axisvm.com.client import start_AxisVM
axvm = start_AxisVM(visible=True, daemon=True)

modelId = axvm.Models.New()
model = axvm.Models[modelId]
Right below the Add function, there is the AddWithDOF, with the following documentation:
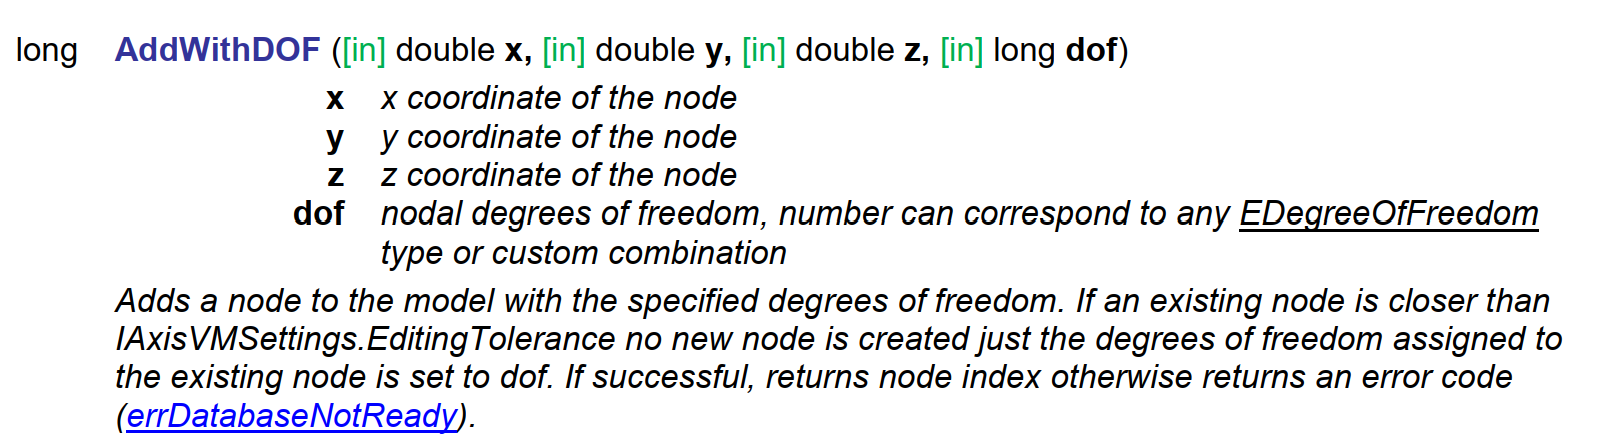
It tells, that the function needs to be called with specifying three scalar values and a fourth one specifying a DOF component. The enumeration EDegreeOfFreedom was listed at the beginning of the documentation of the interface.
from axisvm.com.tlb import dofFree
id1 = model.Nodes.AddWithDOF(-1, -1, 0, dofFree)
id2 = model.Nodes.AddWithDOF(1, -1, 0, dofFree)
id3 = model.Nodes.AddWithDOF(1, 1, 0, dofFree)
id4 = model.Nodes.AddWithDOF(-1, 1, 0, dofFree)
After the session has ended, close the application by
axvm.Quit()
More advanced examples#
If you want more, check out the user guide, where you will find a growing set of examples to suopport you in your learning process. We suggest you to continue what you’ve done in the previous section of this page. Have the AxisVM API REFERENCE pdf document opened, and see for yourself how endpoints and returned data were used.